
Hi All,
Happy Valentine’s Day!! It’s been a little bit of a hectic week, but today I am back and talking about cake pops, which I made as a sweet treat for V-Day this year!♥
I know you may be thinking, “Cake pops?! Those are soooo 2011.” And I totally agree! To be honest back in 2011, I thought cake pops were a pretty dumb trend. I didn’t understand why anyone wouldn’t just eat a delicious piece of cake like normal?! Remember how they even made cake pop machines and they were everywhere?! It was a new level of baking craziness that I was never really on board with.
Fast forward to 2019 and I’m now the mother of a precious, little 2-year-old girl. I (like every other typical mother in America) frequent Target either weekly or biweekly. And I can’t help but stop at the in-store Starbucks before heading out to get a nice beverage to perk myself up. One thing that Starbucks always has in their shiny display case of goodies is cake pops! Pretty pink cake pops with sprinkles on them, which seem to catch my daughter’s wandering eye quite easily. Last week was the second time that I relented and bought her one since she had been so good while shopping. The second we got home, she happily plopped herself down on the kitchen floor and ate her cake pop with glee. Earlier while we were waiting in this long line at Starbucks, I started thinking that it must be pretty easy to make these dumb cake pops. I knew that I definitely had cake mix and frosting at home, so I decided to give it a try and make them myself. How difficult can it be to put cake on stick, I thought?! It turns out, actually pretty difficult!
I started my cake pop process by first going to google and searching for cake pop recipes. I got the general gist of what to do by reading up on a few food blogs and realized that I first needed to purchase some essential items like cake pop sticks. And then what the heck was I going to store them in to stay fresh?! I didn’t want to lay them all on top of each other in a big Tupperware container, so I had to buy little dessert bags for them. They’ll just look fancy and who doesn’t like a fancy dessert?! Then I realized I needed something for them to stand up in for when the chocolate was drying, so I had to also get a cake pop stand. This particular stand also doubles as a cupcake stand and I used a one of those ubiquitous 40% off coupons at Michael’s, so it was $15. (A few blogs noted that you could poke small holes in a box and dry them that way, but honestly, I felt like that seemed too difficult of a task!)
Ok, now that I felt that I had every supply needed, I set out to make the cake pops. This turned out to be a bit of a lengthy process but worth it!
Step 1: Bake a cake.
This was super easy since I had a yellow Duncan Hines cake mix in my cabinet just begging to be used and I’m an expert cake baker with boxed mixes! I decided to bake the cake in one large 13×9 inch pan since I was going to crumble it all up anyway in Step 2. I set that to bake and it was done in no time. I let this cool for at least a few hours before moving on to the next step.
Step 2: Crumble up the cake and add frosting to it in order to form cake balls.
After reading a few recipes, I decided to not add a full container of frosting because it sounded like that may be a bit too much. So I first added about 2/3 of the jar and mixed thoroughly. I added a little bit more to get what I thought was the best consistency and ended up using about ¾ of a standard jar of frosting in total.
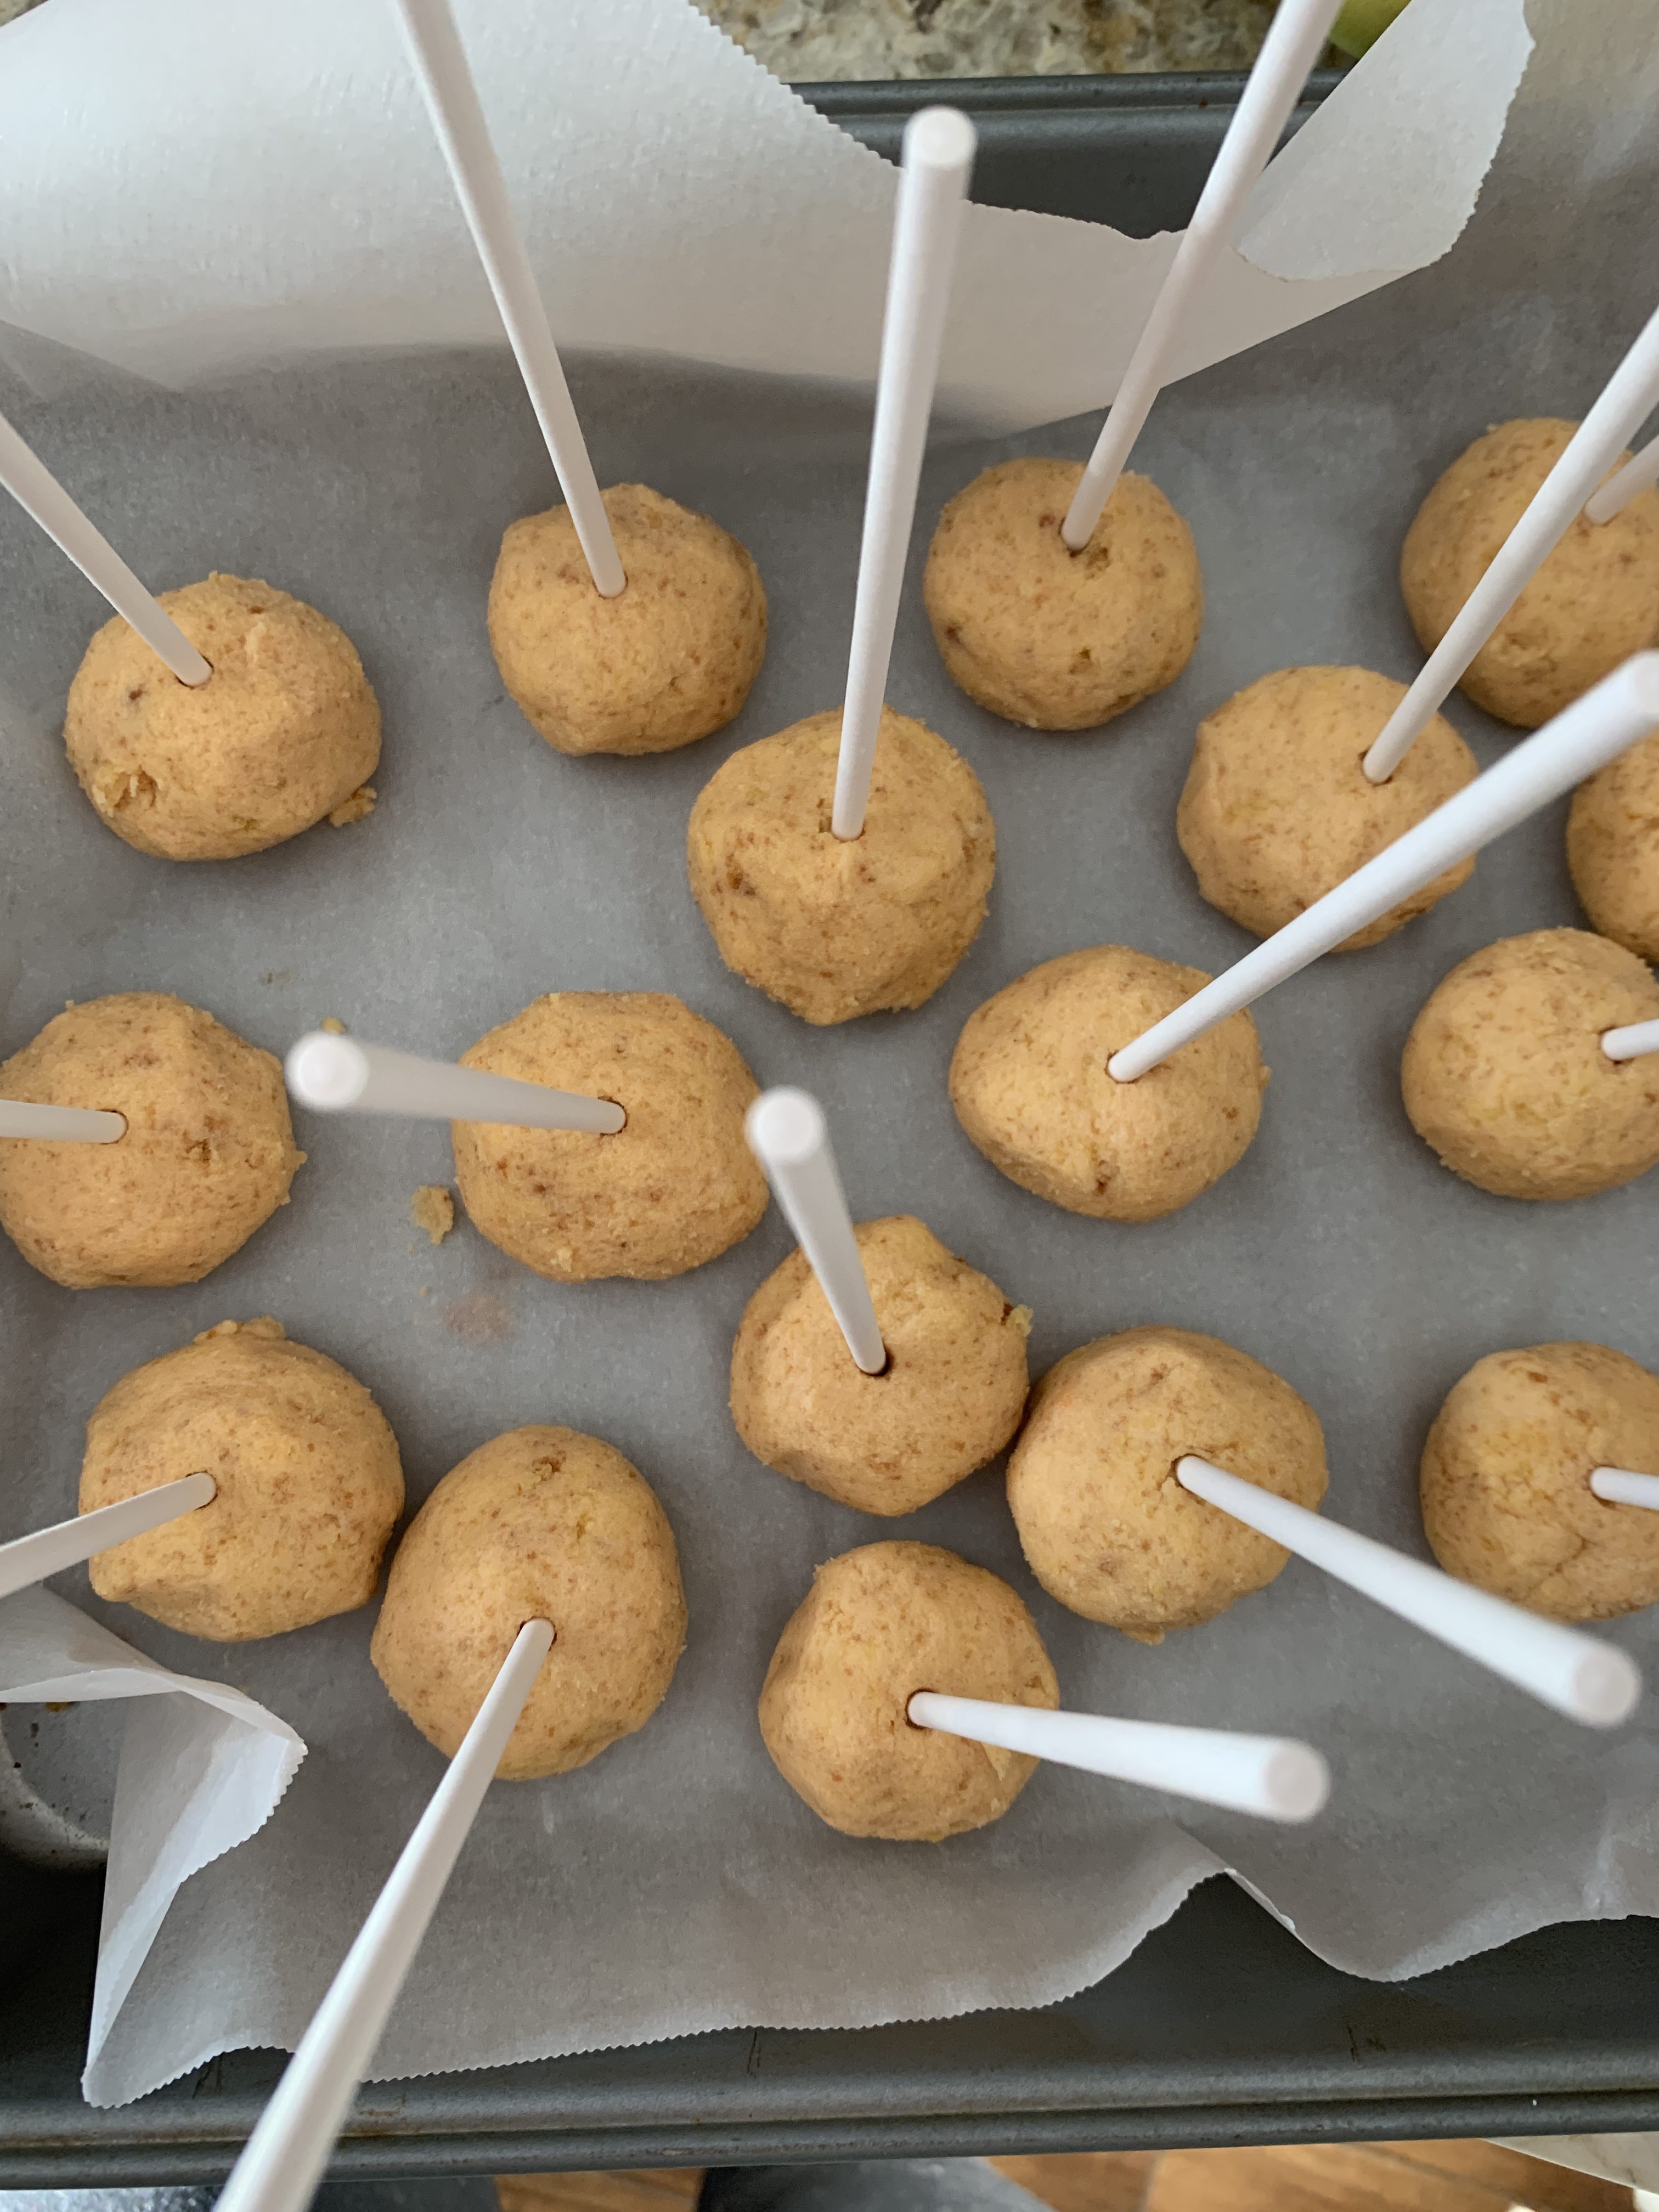
Step 3: Roll the dough into balls.
At this point, I gave up using a spoon to fully mix my cake dough because in cases like this, your hands do a better job. It’s like forming meatballs, and in a similar fashion I took some dough and formed 1½ to 2 inch cake balls. I ended up with 34 balls which I was pretty happy with. Most of my research stated that you should get 35, but I had eaten a big hunk of cake before adding the frosting! Oops – so 34 seemed to be accurate for me in this case!
This was perfect because the set of lollipop sticks that I purchased contained 35, so I didn’t want any amount over that. I stuck a stick into each pop trying to be careful to not stick through the whole cake pop and ruin it, but I did about 2 or 3 times. Whoops. I then place each cake pop on a piece of parchment paper that I had lined two baking pans with.
Step 4: Put all of the cake pops in the freezer and freeze for at least 2 hours.
This was actually quite challenging because I don’t know about you, but my freezer is usually pretty full and I don’t just have two shelves of empty space to freeze 35 cake balls on sticks! I first had to do a ton of maneuvering and reorganizing in order to get the shelf space empty in order for them to freeze. Whew. By the time I was done doing this, I decided to just call it a day and let them freeze overnight. I would do the final step of dunking them in chocolate the next day.
Step 5: Dipping the frozen cake pops in chocolate.
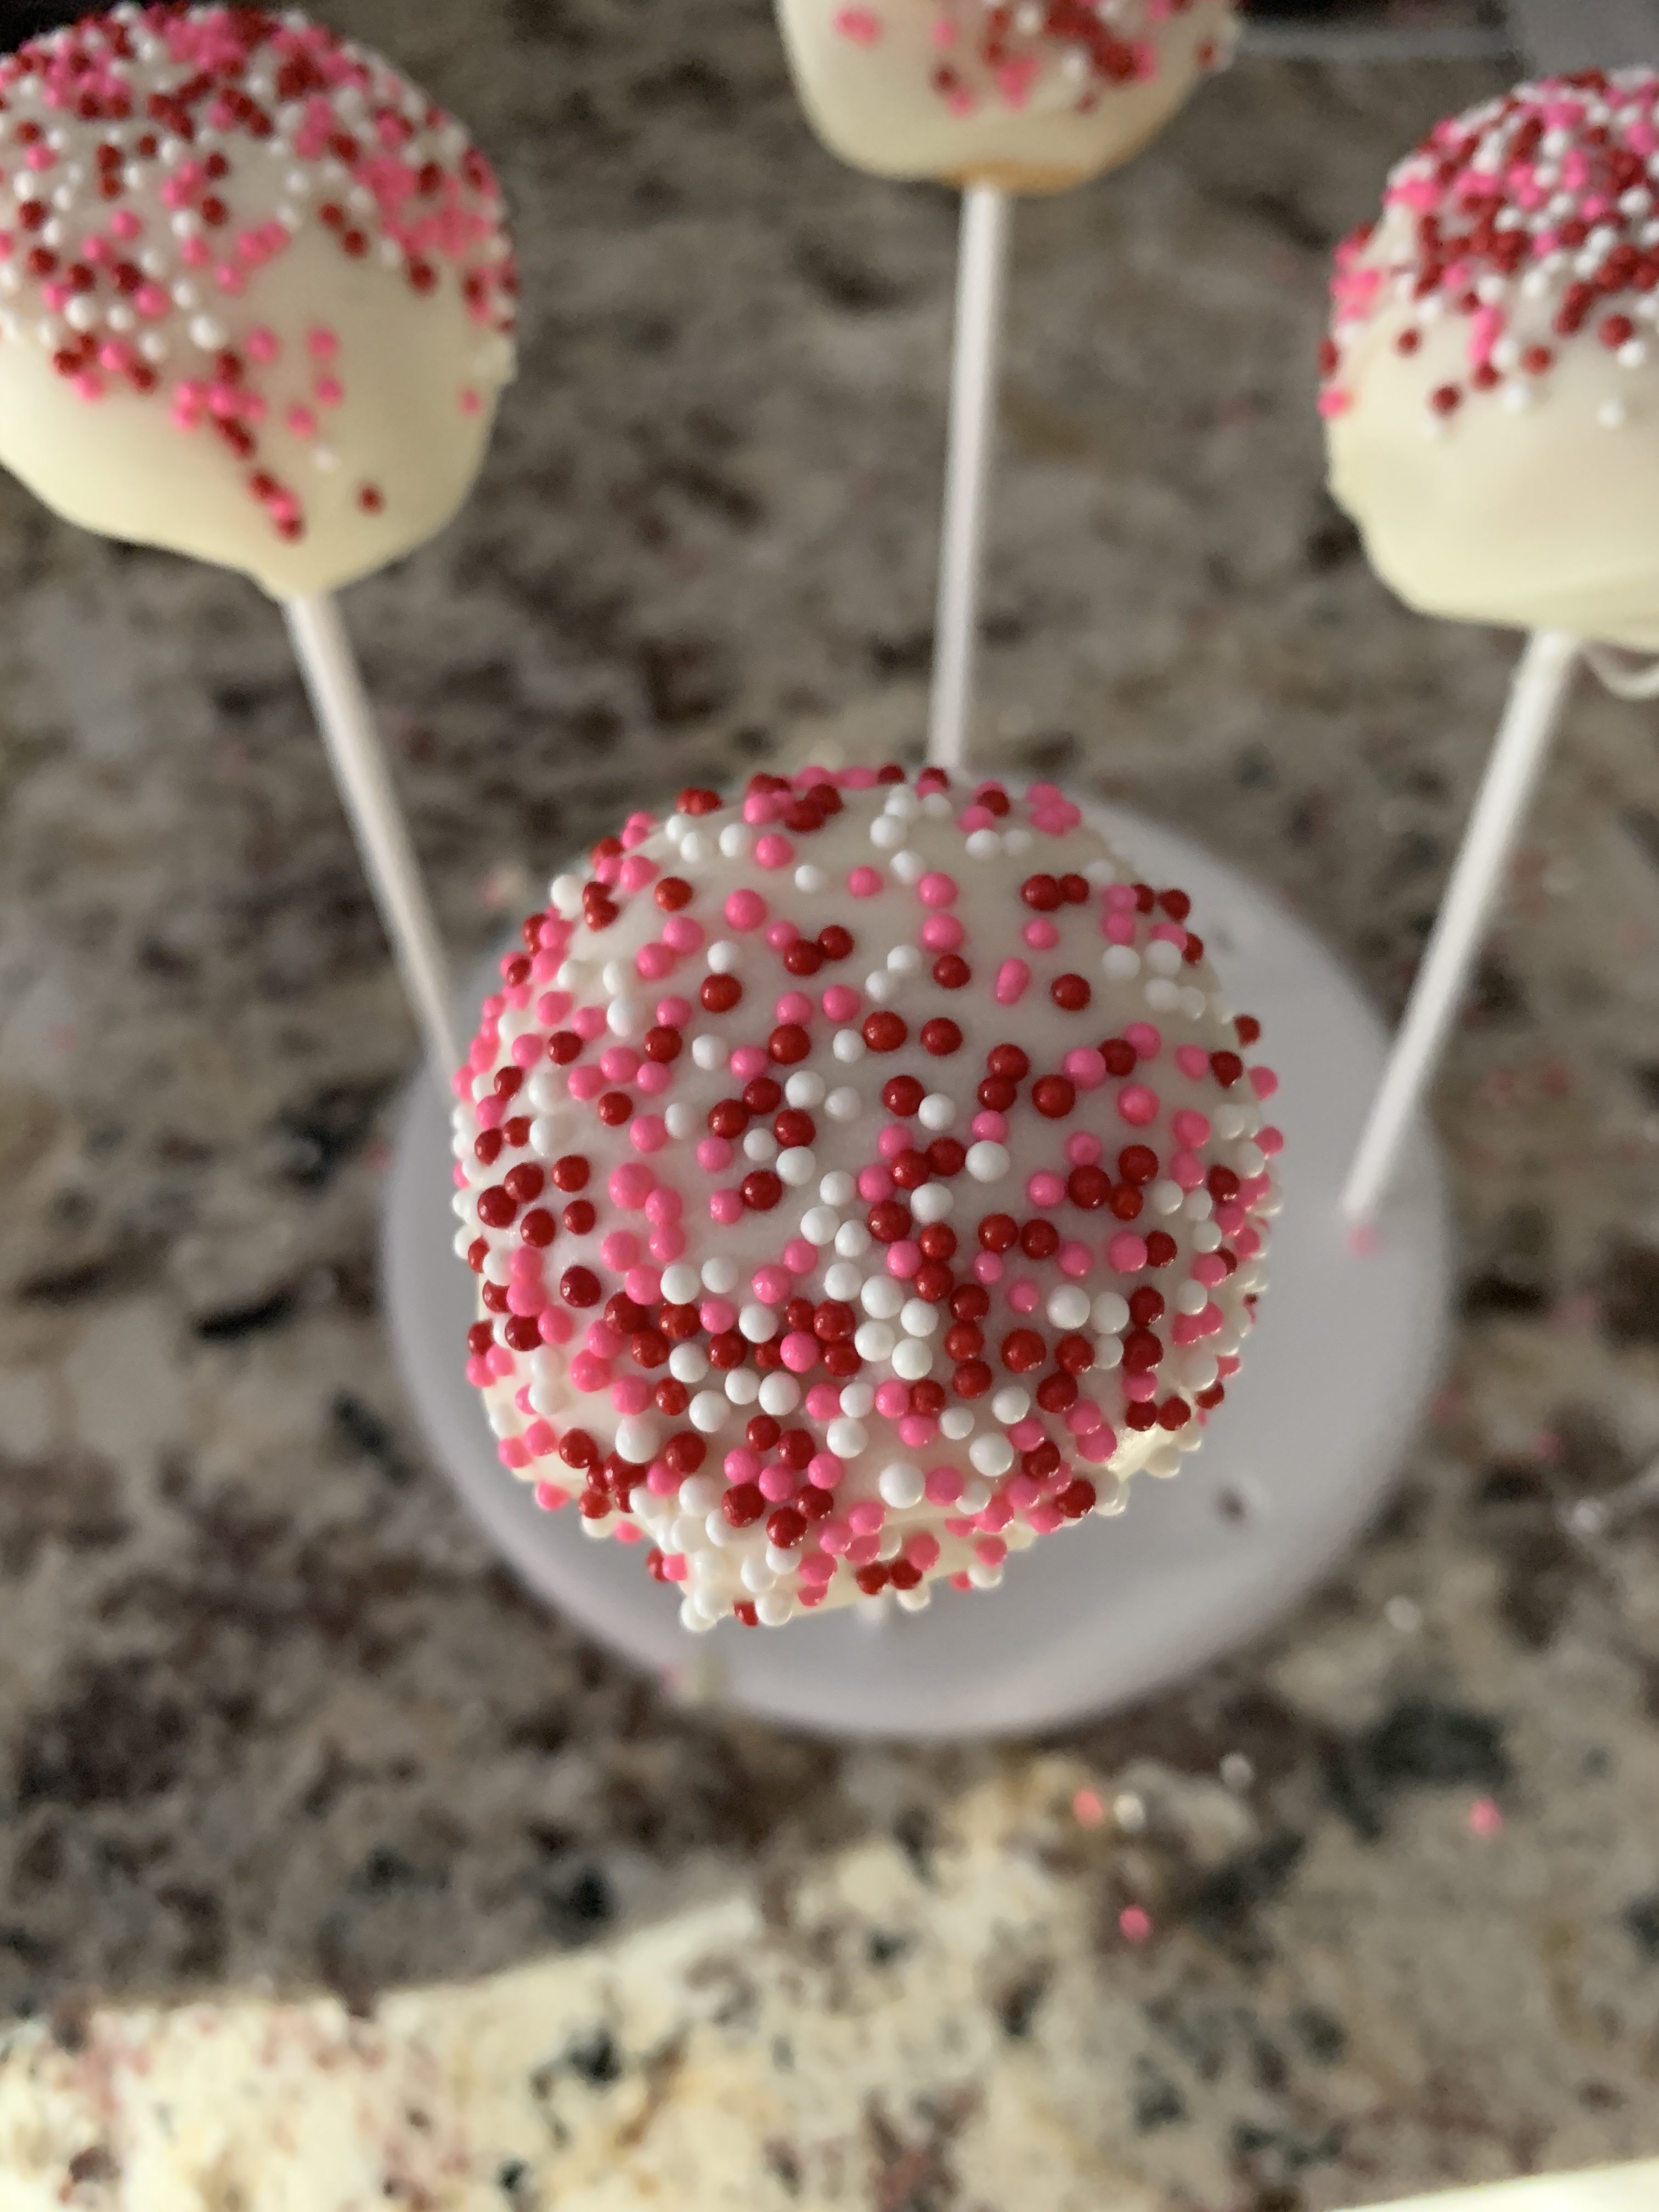
You can buy dipping chocolate from Michael’s or any other baking/craft supply store, or you can just use chocolate chips. I always have bags and bags of chocolate chips around because I will literally just eat them out of the bag as an afternoon snack! So I happened to have 1 ½ bags of white chocolate chips left over from making my Christmas Crack and I had 1 full bag of regular chocolate chips. I decided to use both and make some pops with a white chocolate coating and some with a milk chocolate coating. I simply melted the chocolate in the microwave and was able to coat about 10 pops at a time before having to microwave again to soften the chocolate. I used up all of the chocolate that I had on hand because I had melted it all, but it could have covered more cake pops had I made more than 35. Then I placed each pop in my handy new cake pop stand and tapped some Valentine’s Day pink and white sprinkles on the chocolate before it could harden. I left them on the stand for about 2 hours to fully dry, but they probably only needed about 1 hour or so.

Sadly, a few pops slipped down the sticks while drying, but they ended up making the cutest looking little mini donuts!


Step 6: After I ensured that the pops were fully dry, I wrapped each pop in a plastic bag and tied them up with the provided twist ties.
And Voila!~ Here is the final product!


They looked pretty good and tasted good too! Although you are adding frosting to the cake and then dipping in chocolate, because they are small in size it isn’t overkill. They are a decadent treat for sure, but I didn’t find them to be overly rich thanks to the small size. And although this was my first time making cake pops, I felt like I learned a lot and I’m sharing my top tips:
1. Make sure you purchase heavy duty lollipop sticks. I bought just some regular ones and I think a thicker stick was needed. I had to be super careful when dipping and spinning the cake pops. I lost a few of them when dipping into the chocolate because it just seemed that the weight was a little too heavy for the stick.
2. Make sure you have adequate freezer space for your cake pops! Almost every recipe that I looked up for cake pops advised freezing them first in order to make the dipping process easier. I agree 100%, but I should have cleared out my freezer ahead of time!
3. Add the sprinkles IMMEDIATELY to the chocolate dip. I don’t know why, but I thought chocolate took longer to harden than it did. I first dipped about 10 cake pops in white chocolate and then put them all on the cake stand to dry. Then I began to added sprinkles, except the chocolate was already somewhat dry and the sprinkles would not adhere! Ugh, it was AWFUL. The sprinkles just really made them look so much prettier and in the end I was left with 10 plain, white, not so pretty cake pops. (They were still very edible though!) After that mess up, I quickly added the sprinkles to each pop immediately after I dipped them and propped them up in the stand. (Side note: I got sprinkles everywhere!! But I think this is a common problem?! It seems there is no clean way to apply sprinkles.)
4. I think I could have used less chocolate. I had a decent amount of chocolate waste and the next time I’m thinking of first melting just 1 cup or 1 ½ cups instead of a full 2 to start with.
5. I understand cake pop machines! Now that I went through this long step by step process of cake pop making, I totally get the appeal of those cake pop machines. I could skip a few steps and just pop sticks in the round little cakes and throw them all in the freezer!
In conclusion, I think cake pops are a little bit of a time-consuming and tedious process, but the end results were really tasty and also pleasing to the eye. These are great for any holiday because you can easily make them festive by using different colored sprinkles and they make an excellent party favor since they are best kept individually wrapped. Also, it was well worth it to see how excited my daughter was that I made a whole batch of them and hear her exclaim “YUMMY” while mowing one down. Later in the day she pointed at all of them all wrapped up and said “Mommy made ’em! Cake pops!” Like she was sooo proud of me! Lol I’ll do anything see her big toothy grin so obviously I will be making these again!♥ I also brought a bunch of them into work and passed out to my favorite coworkers as Valentine’s gifts and gave a bunch to my family members as well! And now that I’ve made a few errors my first time around, my second time should be a little smoother but with an equally delicious outcome! As for the ones from Starbucks, I’m sure I’ll be back soon enough to buy theirs since these are way too much work for me to be making every week or even biweekly! 😉
What do you think about cake pops? Have you ever made them? Let me know in the comments what your experience was or if you have any other tips for me! I’ve linked some great products from Amazon below that you could use for making cake pops as well!
Xo
Holly

Comments are closed.